Using openCARP with JupyterLab
JupyterLab notebooks are electronic documents combining text, mathematical formulas, code as well as data, figures and tables generated by that code. As such they are a good tool for reproducible computational research. In this document, we show you how to use openCARP with JupyterLab notebooks on a remote server as a service, on supported HPC systems, or on your local machine.
The JupyterLab provides an access to the file system in a virtual computer on the machine which hosts the simulation. The interface offers the possibility to download the results of the simulation to your computer. You can also take advantage of the Python interpreter within the JupyterLab to process the simulation results within the notebook. This way you can use a large number of native Python packages for data visualization (such as matplotlib). This way the notebook can be used to document and publish your workflows.
openCARP JupyterLab on the Binder Platform
The simplest way of accessing openCARP JupyterLab notebooks is through the Binder platform.
The link above will open a website, which will load a virtual machine containing openCARP. Please be patient, as the process might take a few minutes.
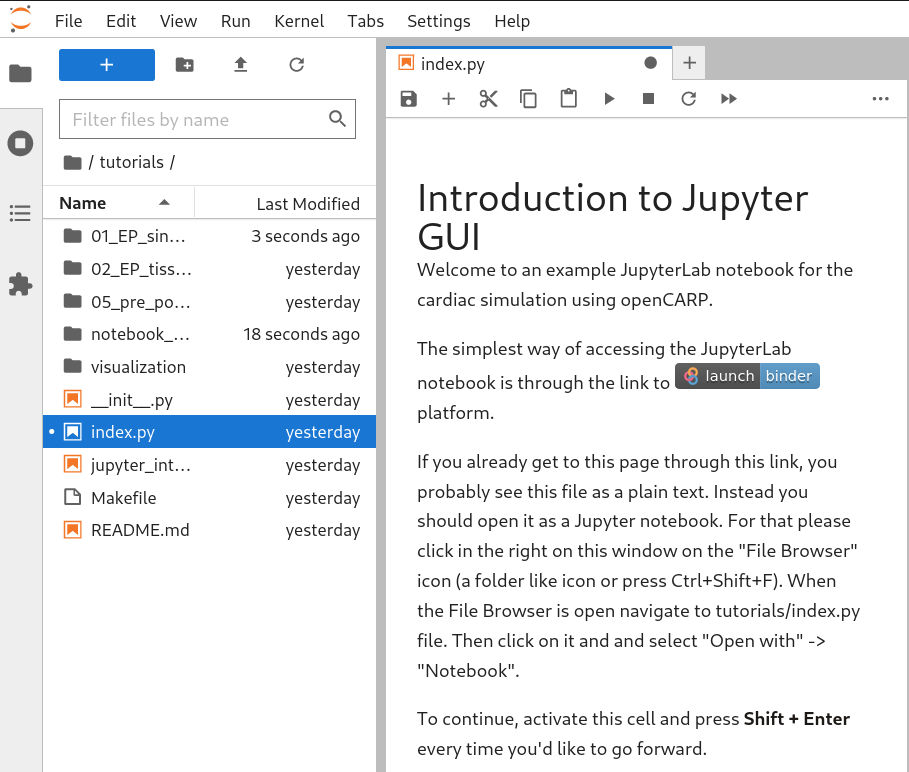
Once Binder starts JupyterLab you'll be able to see the file tutorial/index.ipynb notebook. After that, you can follow the instructions in the text of the notebook similar to the one shown below.
This environment helps you to setup openCARP without the need for installation on your own machine. However, the resources you can use in this way are limited and the results of the computations are lost any time the connection to Binder is terminated. If you want to prevent it or need to do extensive computations, you can setup the container on your own computer or use an HPC system as described in the following section.
openCARP JupyterLab on HPC Systems
Many HPC systems offer access through JupyterLab as an alternative to the traditional shell access via ssh. The bwUniCluster Jupyter Interface is one of the examples and the setup of a new container is described in their wiki page. To use openCARP you need login to the JupyterLab-enabled HPC system (such as bwUniCluster 2.0) and fill out the form as shown here:
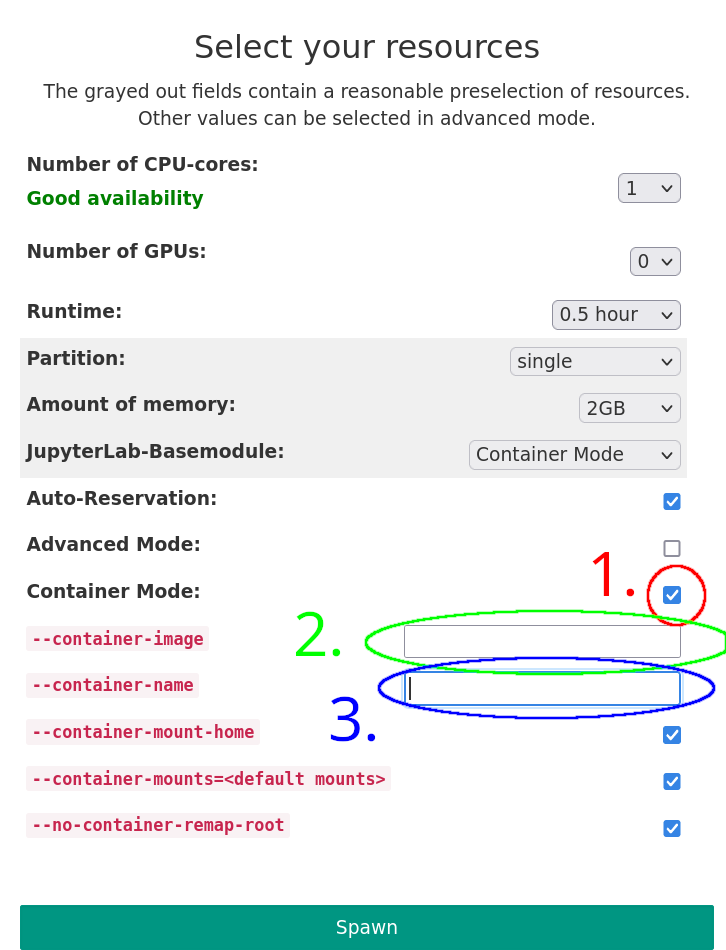
- Select the "Container Mode" checkbox
- Specify the
--container-imagefor openCARP. For the latest container image from the master branch, usedocker.opencarp.org#opencarp/opencarp:latest(note that the#sign is required between the URL domain and path on the server) - Optionally, you can specify the
--container-name. If you do so, the container will be saved in your user file system of bwUniCluster. Then, the same container can be re-launched later without explicit container image selection (step 2).
Then, that the image will be downloaded and spawned with the required resources. It also automatically mounts your home folder, where you can store the notebooks you are working on. The logs from spawning the container are also stored in that folder, which is particularly useful for debugging if something does not work as expected.
Behind the scenes, the HPC systems installs the required packages for JupyterLab and uses the tools as detailed by the bwUniCluster support:
The container integration on the JupyterHub is done via enroot/pyxis [1] and is equivalent to how you would start a container via pyxis and SLURM. The
--container-image=option downloads a container (for example from Docker Hub), and starts the job. The container can then be found in~/.local/share/enrootWith the--container-name=option you can give the container a name, via which it can be started again without having to download it again.In short if you have your own container, you can put it to
~/.local/share/enrootmake sure the name has the prefix pyxis_ (e.g pyxis_ubuntu). You should be able to start it by just specifying the--container-name(e.g ubuntu).--container-image=can be left empty. Or you can upload your container to a registry and download it via--container-image=If you want to start it via JupyterHub, Python has to be installed in the container.[1] https://wiki.bwhpc.de/e/BwUniCluster2.0/Containers#SLURM_Integration
by Pascal (bwUniCluster support)
If you have experience with others HPC systems using JupyterLab please let us know either in the Q2A system or via email.
openCARP JupyterLab locally (with Docker)
We also provide a Docker container including openCARP and JupyterLab. Containers are a popular way of distributing applications packaged with their dependencies and configuration files, so that it is easy to provide a consistent environment across different systems. You need to have docker and docker-compose installed on your computer (see for example here for instructions). You can start the virtual machine in your clone of the 'openCARP/experiments' repository e.g. by running
git clone https://git.opencarp.org/opencarp/experiments.git
cd experiments/docker/
docker-compose up
This command will prepare and start the container on your computer. Then, you can access the JupyterLab interface running on your machine.
Building your own Notebooks
A limited number of examples is provided as a demonstration of the capabilities of the JupyterLab interface. You can, of course, build your own experiments according to your needs. The experiments can be classic carputils scripts or include interaction widgets within the notebook so that it is going to be easier for the users to interact with your notebook. A good starting point to learn about the available widgets is the jupyter-widgets/tutorial (can be also started with Binder).
For convenience, we have also prepared the script
tutorial/notebook_builder/build_widgets.py
. This script can parse the command line options of your carputils script (such as the run.py files in the examples) and generate widgets that can then be used in the notebooks such as shown below.
